At DevDay 2025 we launched AgentKit, a complete set of tools for developers and enterprises to build, deploy, and optimize agents. AgentKit is a set of interconnected building blocks:
Agent Builder: visually build and iterate on agent workflows
ChatKit: easily embed chat-based workflows into your app
Evals: improve the performance of your LLM-powered apps
This cookbook will take an end-to-end journey through AgentKit - we'll build, deploy, and optimize an app. You'll understand how AgentKit’s building blocks connect together, enabling you to bring your agentic workflows into production faster and more reliably.
We’ll walk through the following steps:
Build a workflow in Agent Builder to serve as the back-end of our app
Deploy a front-end chat app using the ChatKit web component
Optimize workflow performance in Evals with prompt optimization and trace grading
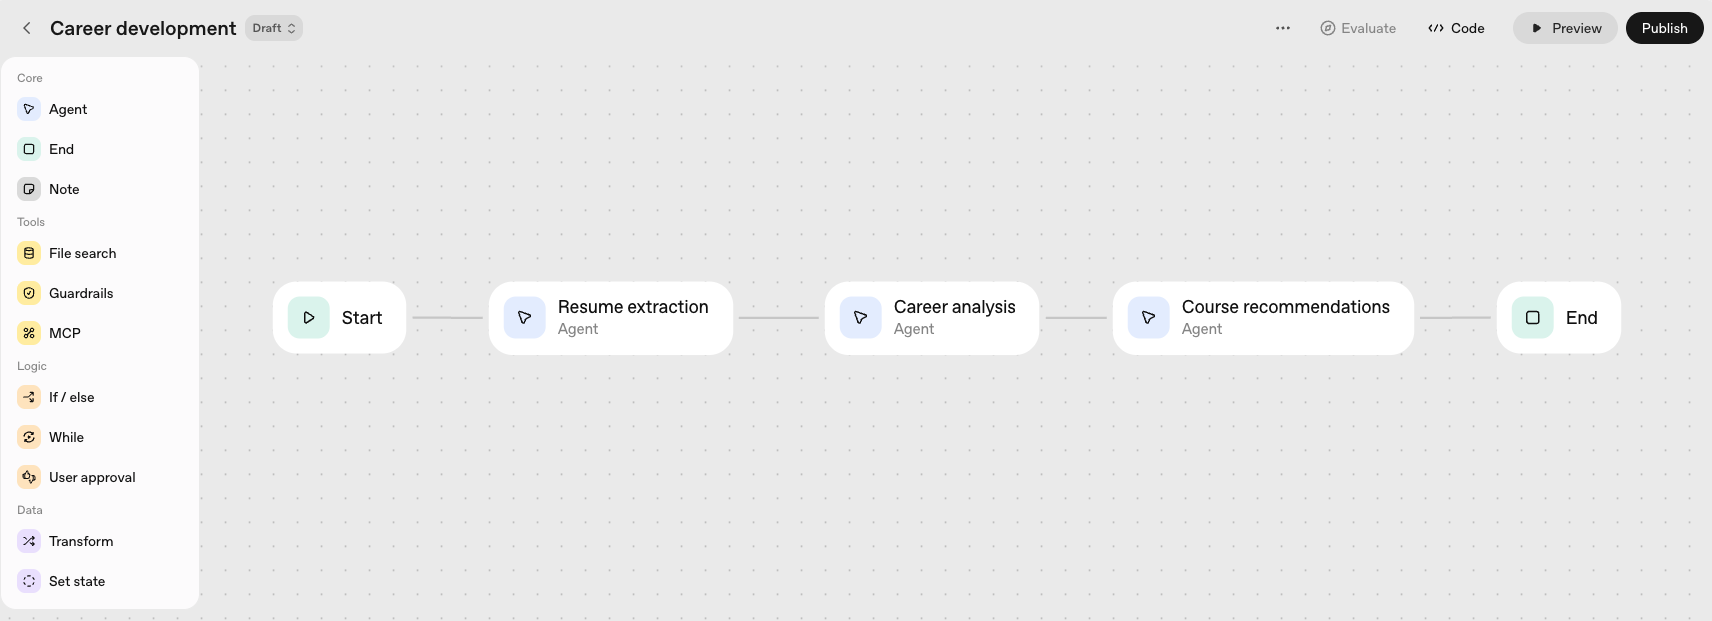
Let's get started by using Agent Builder to create the initial workflow that will underpin our app. Agent Builder is a visual canvas that lets you drag-and-drop nodes to design your agentic workflows. You can learn more about Agent Builder here, including additional functionality and a full list of supported nodes, but in this cookbook we'll create a simple workflow with three Agent nodes working sequentially.
We’ll build a simple app that helps people accelerate their careers through curated learning recommendations. Users can upload their resume and tell us their dream job, and they'll receive a curated set of learning courses based on the skills they need to develop. So we'll create three agents:
Resume extraction agent to parse uploaded resumes and extract relevant skills and experiences
Career analysis agent to analyze knowledge gaps relative to their target job
Course recommendation agent which uses the upstream information to suggest relevant online courses.
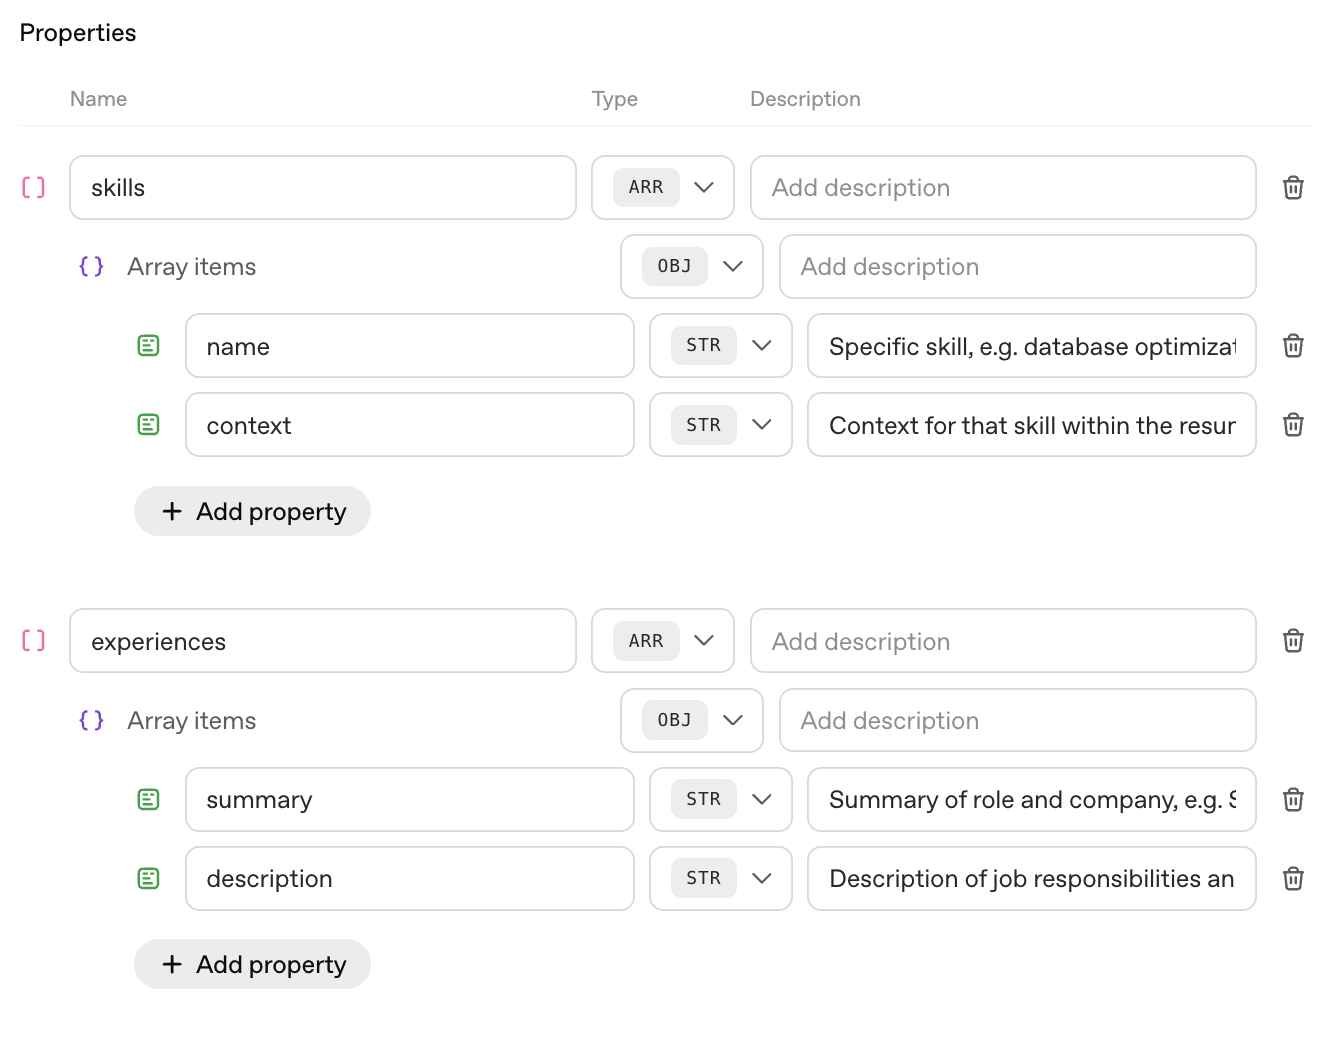
This agent will be responsible for parsing the uploaded resume and returning a structured output of skills and experiences that will be used for downstream analysis. We'll use the following prompt:
Extract and summarize information from the input resume, organizing your output by category and providing context where available.- Analyze the provided input to identify skills and professional experiences.- For each skill or experience, extract the supporting context or evidence from the text (e.g., for the skill of Python, context might be “used Python in data analysis for three years at [Company]”).- Continue reviewing the text until all skills and experiences are extracted.
We'll use gpt-5 for this agent, starting with minimal reasoning, but we can always change the model later if needed. And, we'll enforce a structured response (by selecting Output format to JSON, and adding a schema) to instruct the model to return the exact data shape we're looking for. (The JSON schema for this structured output can be found here.)
This agent will analyze skill and knowledge gaps for an individual to progress to a desired professional or career goal. We'll use gpt-5 for this agent and select reasoning effort low, which should provide sufficient reasoning for this level of analysis while keeping the responses sufficiently fast.
Your role is to analyze skill and knowledge gaps for an individual to progress to a desired professional or career goal. You will receive a list of the already-obtained skills and experiences of an individual, as well as a description of the goal. First, understand the goal and analyze the critical skills or knowledge areas required for achieving the goal. Then, compare the requirements to what the individual already possesses. Return a list of the top 3-5 skills that the individual does not possess, but are important for their professional goal. Along with each skill, include a brief description.Individual's expressed goal: {{workflow.input_as_text}}Already-obtained skills and experiences:{{input.output_text}}
Note that our prompt includes context from previous nodes enclosed in {{brackets}}. You can also click "Add context" to see the context variables to the model.
This agent will use the web search tool to find and select online training courses that match the identified skill gaps. We'll use gpt-5 with minimal reasoning and equip this agent with Web Search.
Your job is to identify and recommend online training courses that help develop one or more of the skills identified. Given the list of required skills and descriptions below, return a list of 3-5 online courses along with course details.Skills: {{input.output_text}}
Now that we've built our initial workflow, we can use the Preview functionality in Agent Builder to give it a spin! We'll first Publish the workflow, which will create a named and versioned copy (with a unique workflow ID) that we can share with colleagues, or deploy or revert between versions as needed.
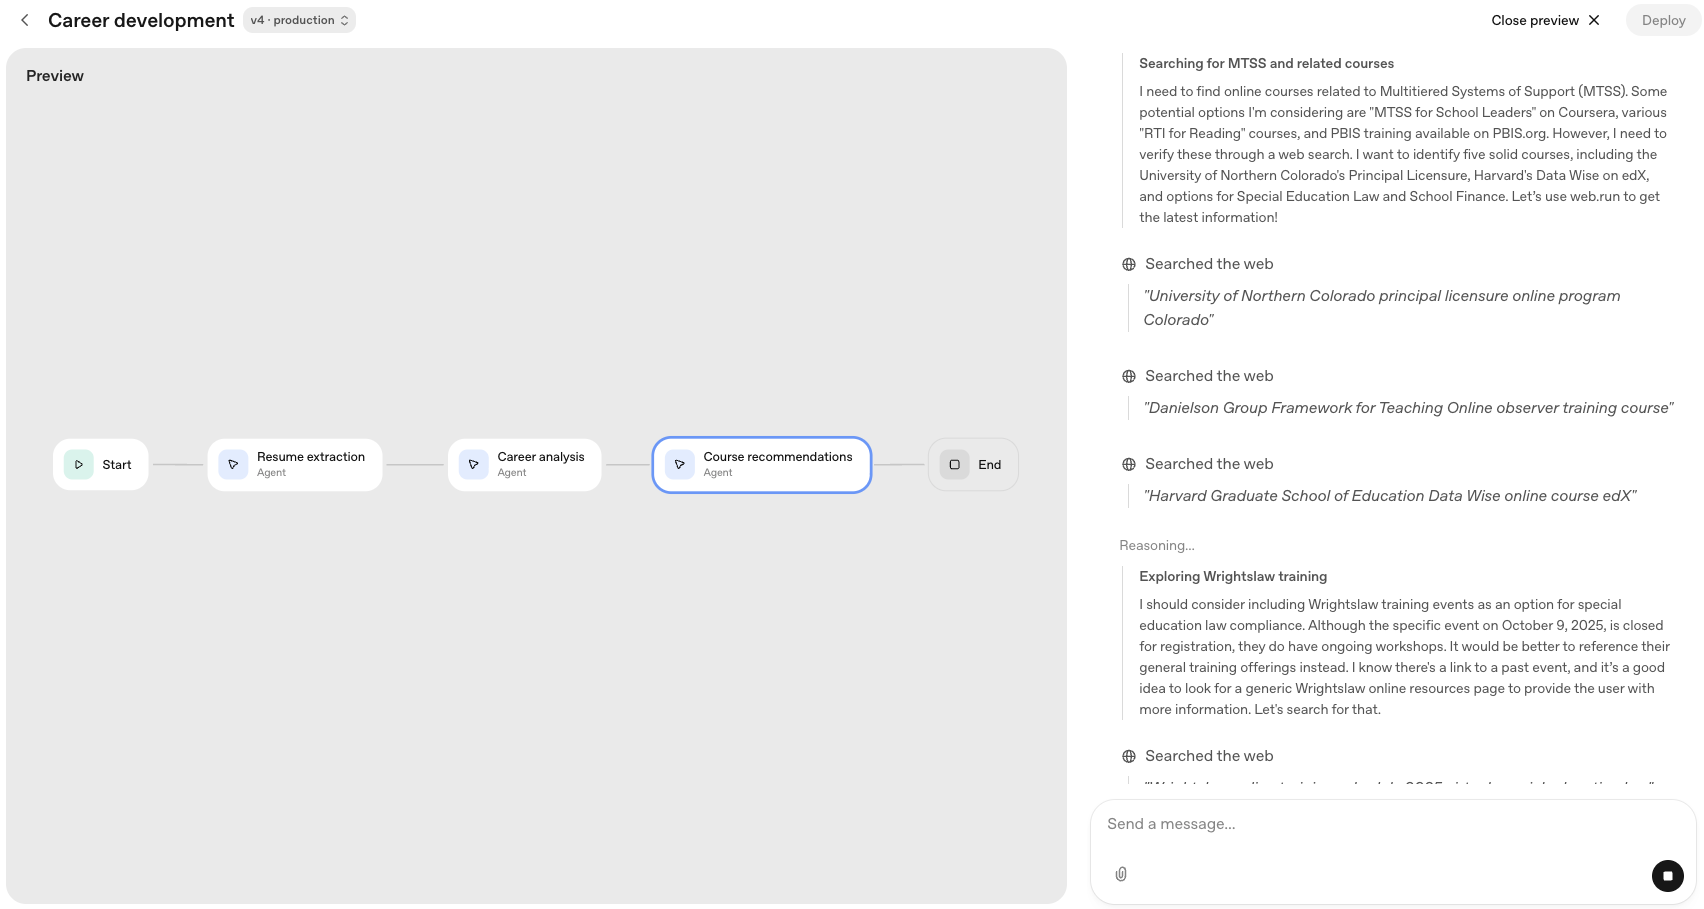
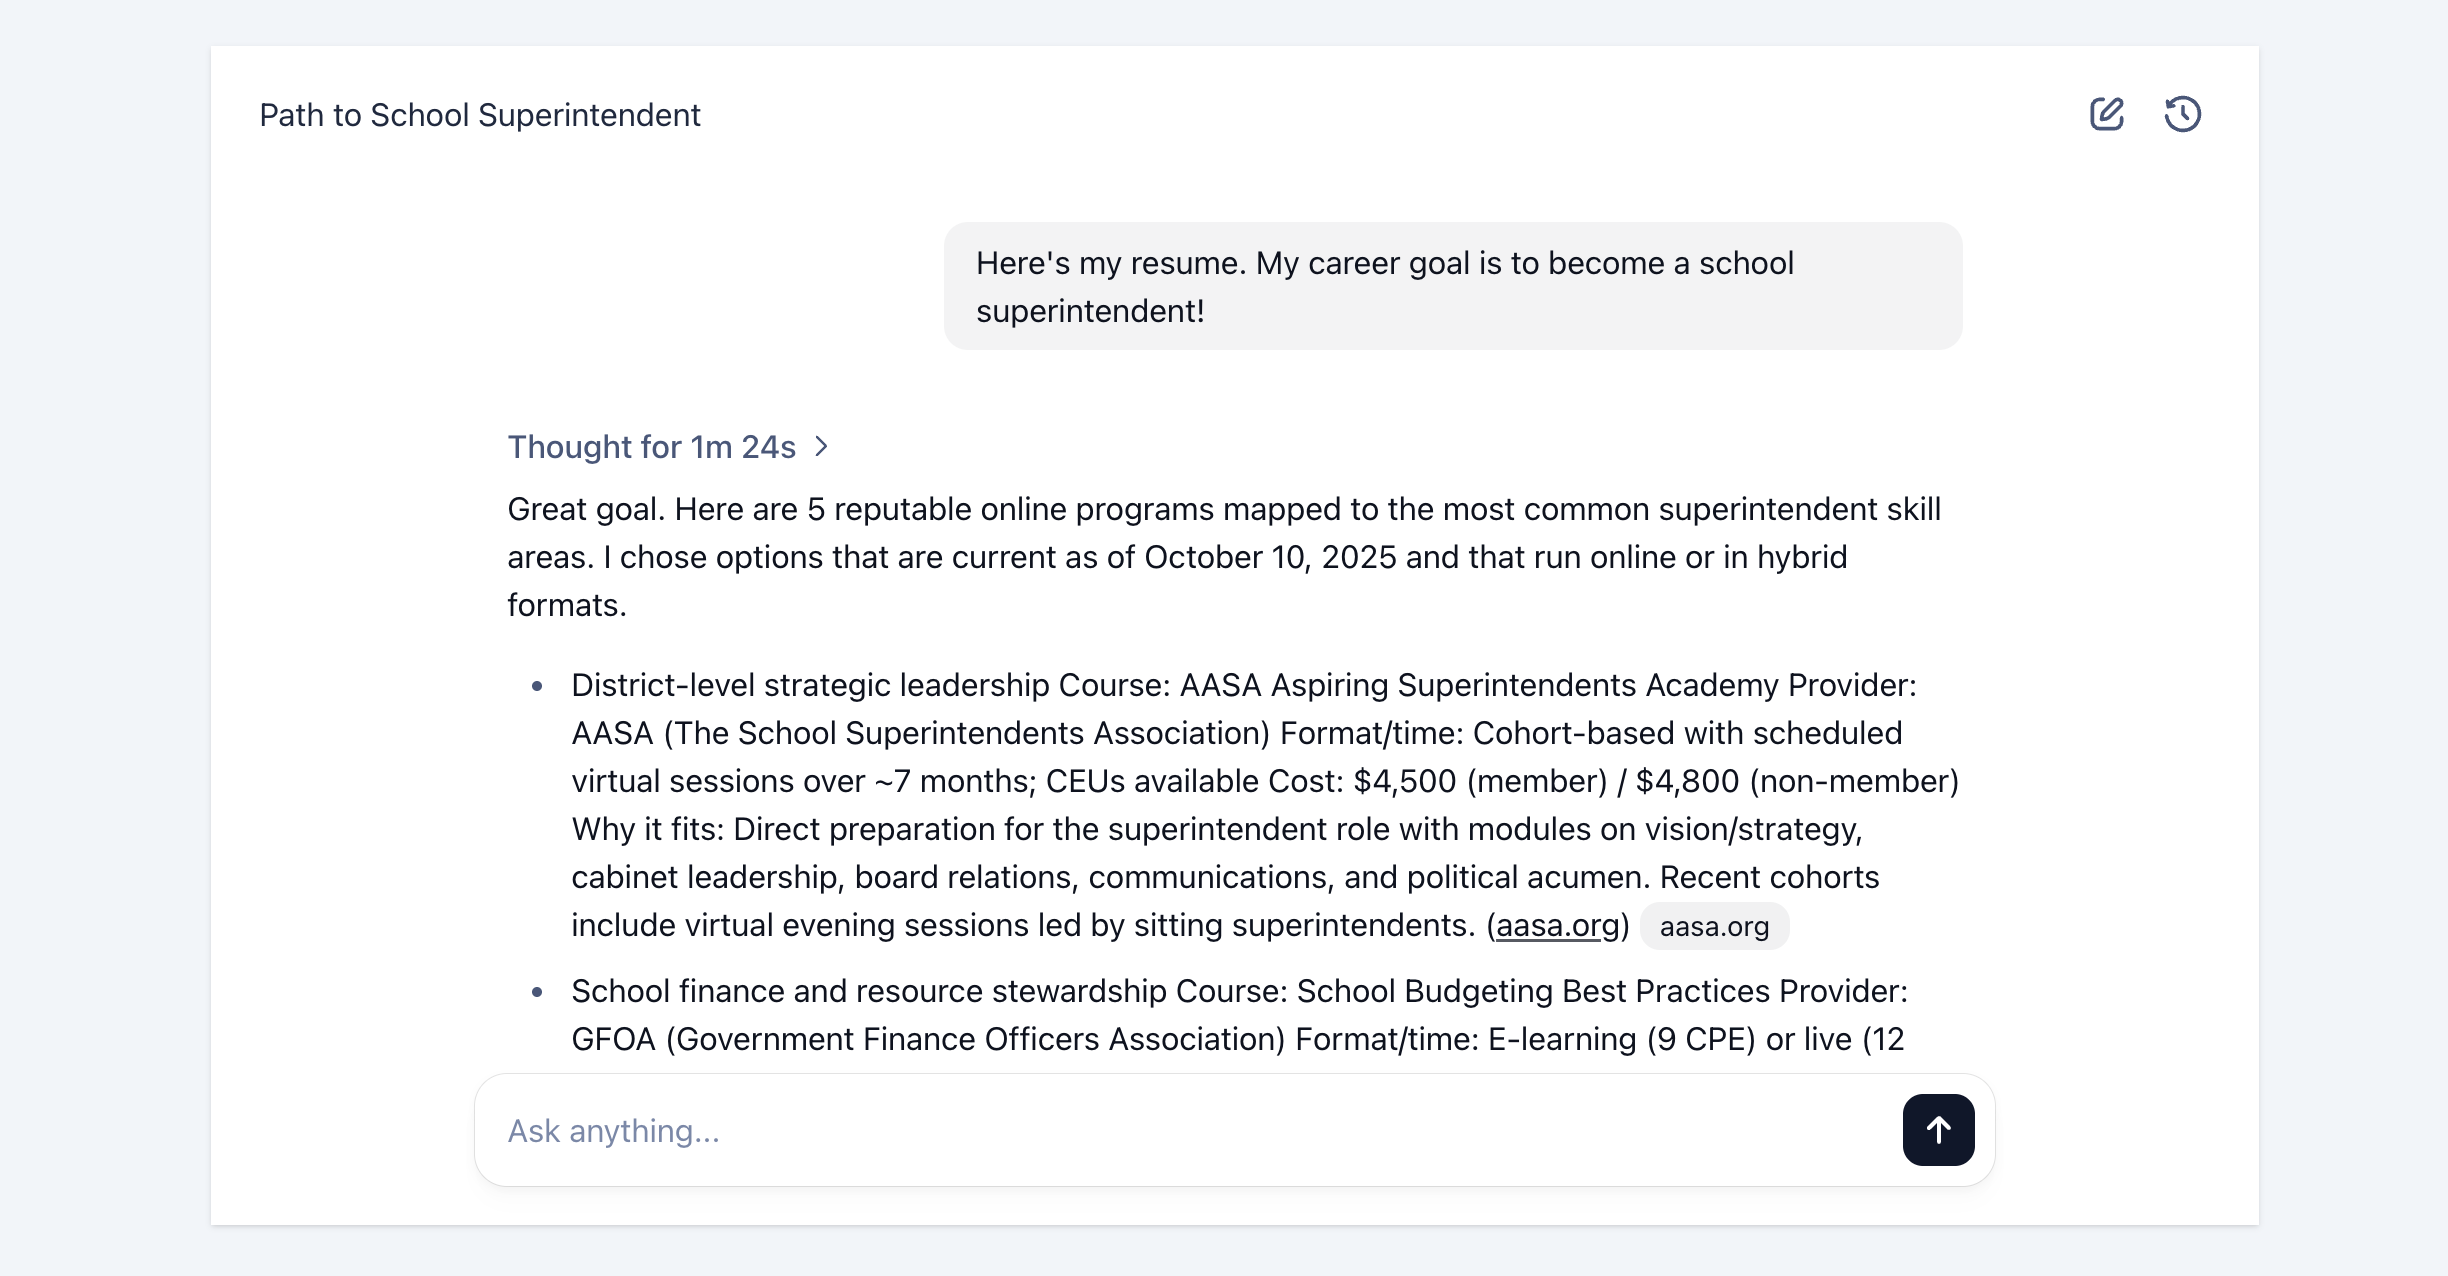
Preview lets you interact with your workflow the same way a chat user would, from directly within Agent Builder. If we upload a resume, type in a description of our dream job, and click Submit, we'll see the workflow proceed step-by-step through each node on the left of the screen, and we'll see the output from each node on the right.
As an example, I've uploaded a resume for a teacher who's looking to become a school superintendent.
We can follow the workflow as it proceeds through resume parsing, skill analysis, and web search. As the workflow completes, as expected we see a list of online programs that meet the search parameters.
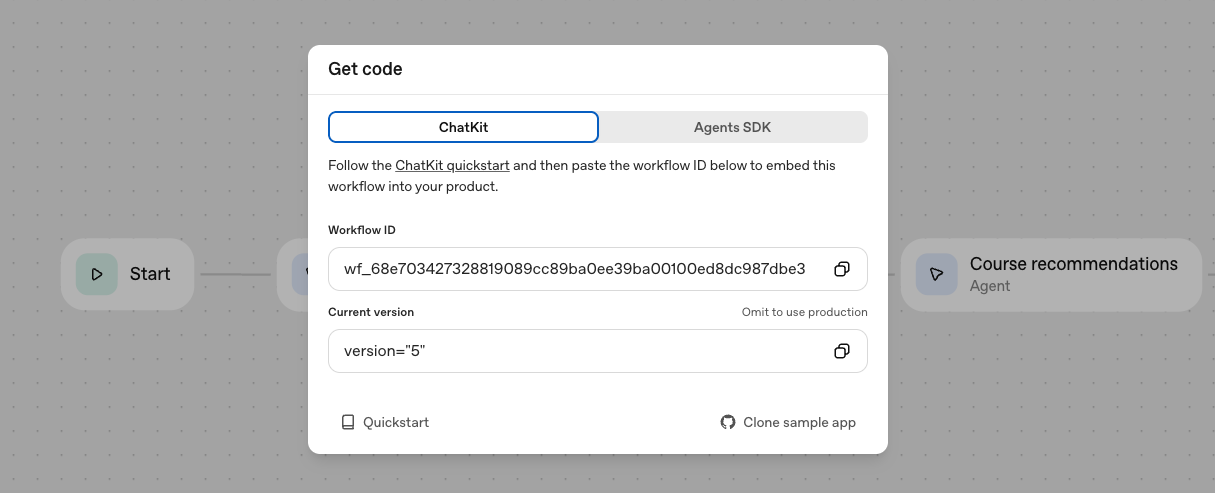
Everything looks good - we're now ready to deploy our app! Let's make sure we publish any changes we've made, and get the workflow ID. We can select "Code" at the top of the screen to access the ID again.
Note that you can use the "Agents SDK" tab to access the code that supports the workflow you just built, implemented using the Agents SDK package (in JavaScript/TypeScript or Python). This is a great option if you want to run your workflow in your own environment, or develop it further with custom functionality. (However, you would miss out on some of the benefits of using AgentKit in an integrated way, as we describe below.)
To deploy our app, we'll use the ChatKit starter template to help us spin up a chat-based app using the ChatKit web component.
Before doing that, it's worth explaining the full set of options that the suite of tools across AgentKit provides for deploying your agentic workflows. We've already seen how you can build a workflow in Agent Builder, and then run it directly within the tool (Preview), or export it as Agents SDK code to use in your own environment. Now, we'll demonstrate how you can use an Agent Builder workflow ID to create a chat experience embedded in your own front-end, which points to the workflow you created as a back-end. (By the way, you can also use just the rich chat GUI provided by the ChatKit SDK, without the workflow back-end - learn more here.)
So let's get started with the ChatKit starter template and plug in our workflow. The starter template makes it simple to spin up a chat-based app using our newly created workflow. Just follow the Getting Started instructions in the repo, entering in your workflow ID from Agent Builder as the value for NEXT_PUBLIC_CHATKIT_WORKFLOW_ID into .env.local, and running npm install and then npm run dev to test the app.
In just a few minutes, the workflow is embedded in a front-end chat interface that's up and running!
One of the most valuable aspects of AgentKit is how quickly it enables you to experiment, iterate, and improve your agentic applications. Let's make some quick changes that will improve the functionality of our app and provide a richer chat experience.
First, let's add some custom theming to give our front-end some style, while still retaining the native chat experience. A great resource here is ChatKit Studio, which includes a playground to explore the customization options in ChatKit, a Widget Builder (which we'll see in action shortly), and sample apps and galleries for inspiration. To get our custom theme, we'll use the ChatKit Playground to visually select our desired style options, click on the </> icon at the top of the Playground screen to get the configuration code.
We'll use the theme object from this code to overwrite the default theme located in lib/config.ts. While we're in that file, we'll also adjust the starter prompts, greeting text, and placeholder copy to more appropriate values:
export const GREETING = "Upload your resume, and tell me the job you're looking to get!";export const PLACEHOLDER_INPUT = "Describe your dream job, and don't forget to attach your resume!";
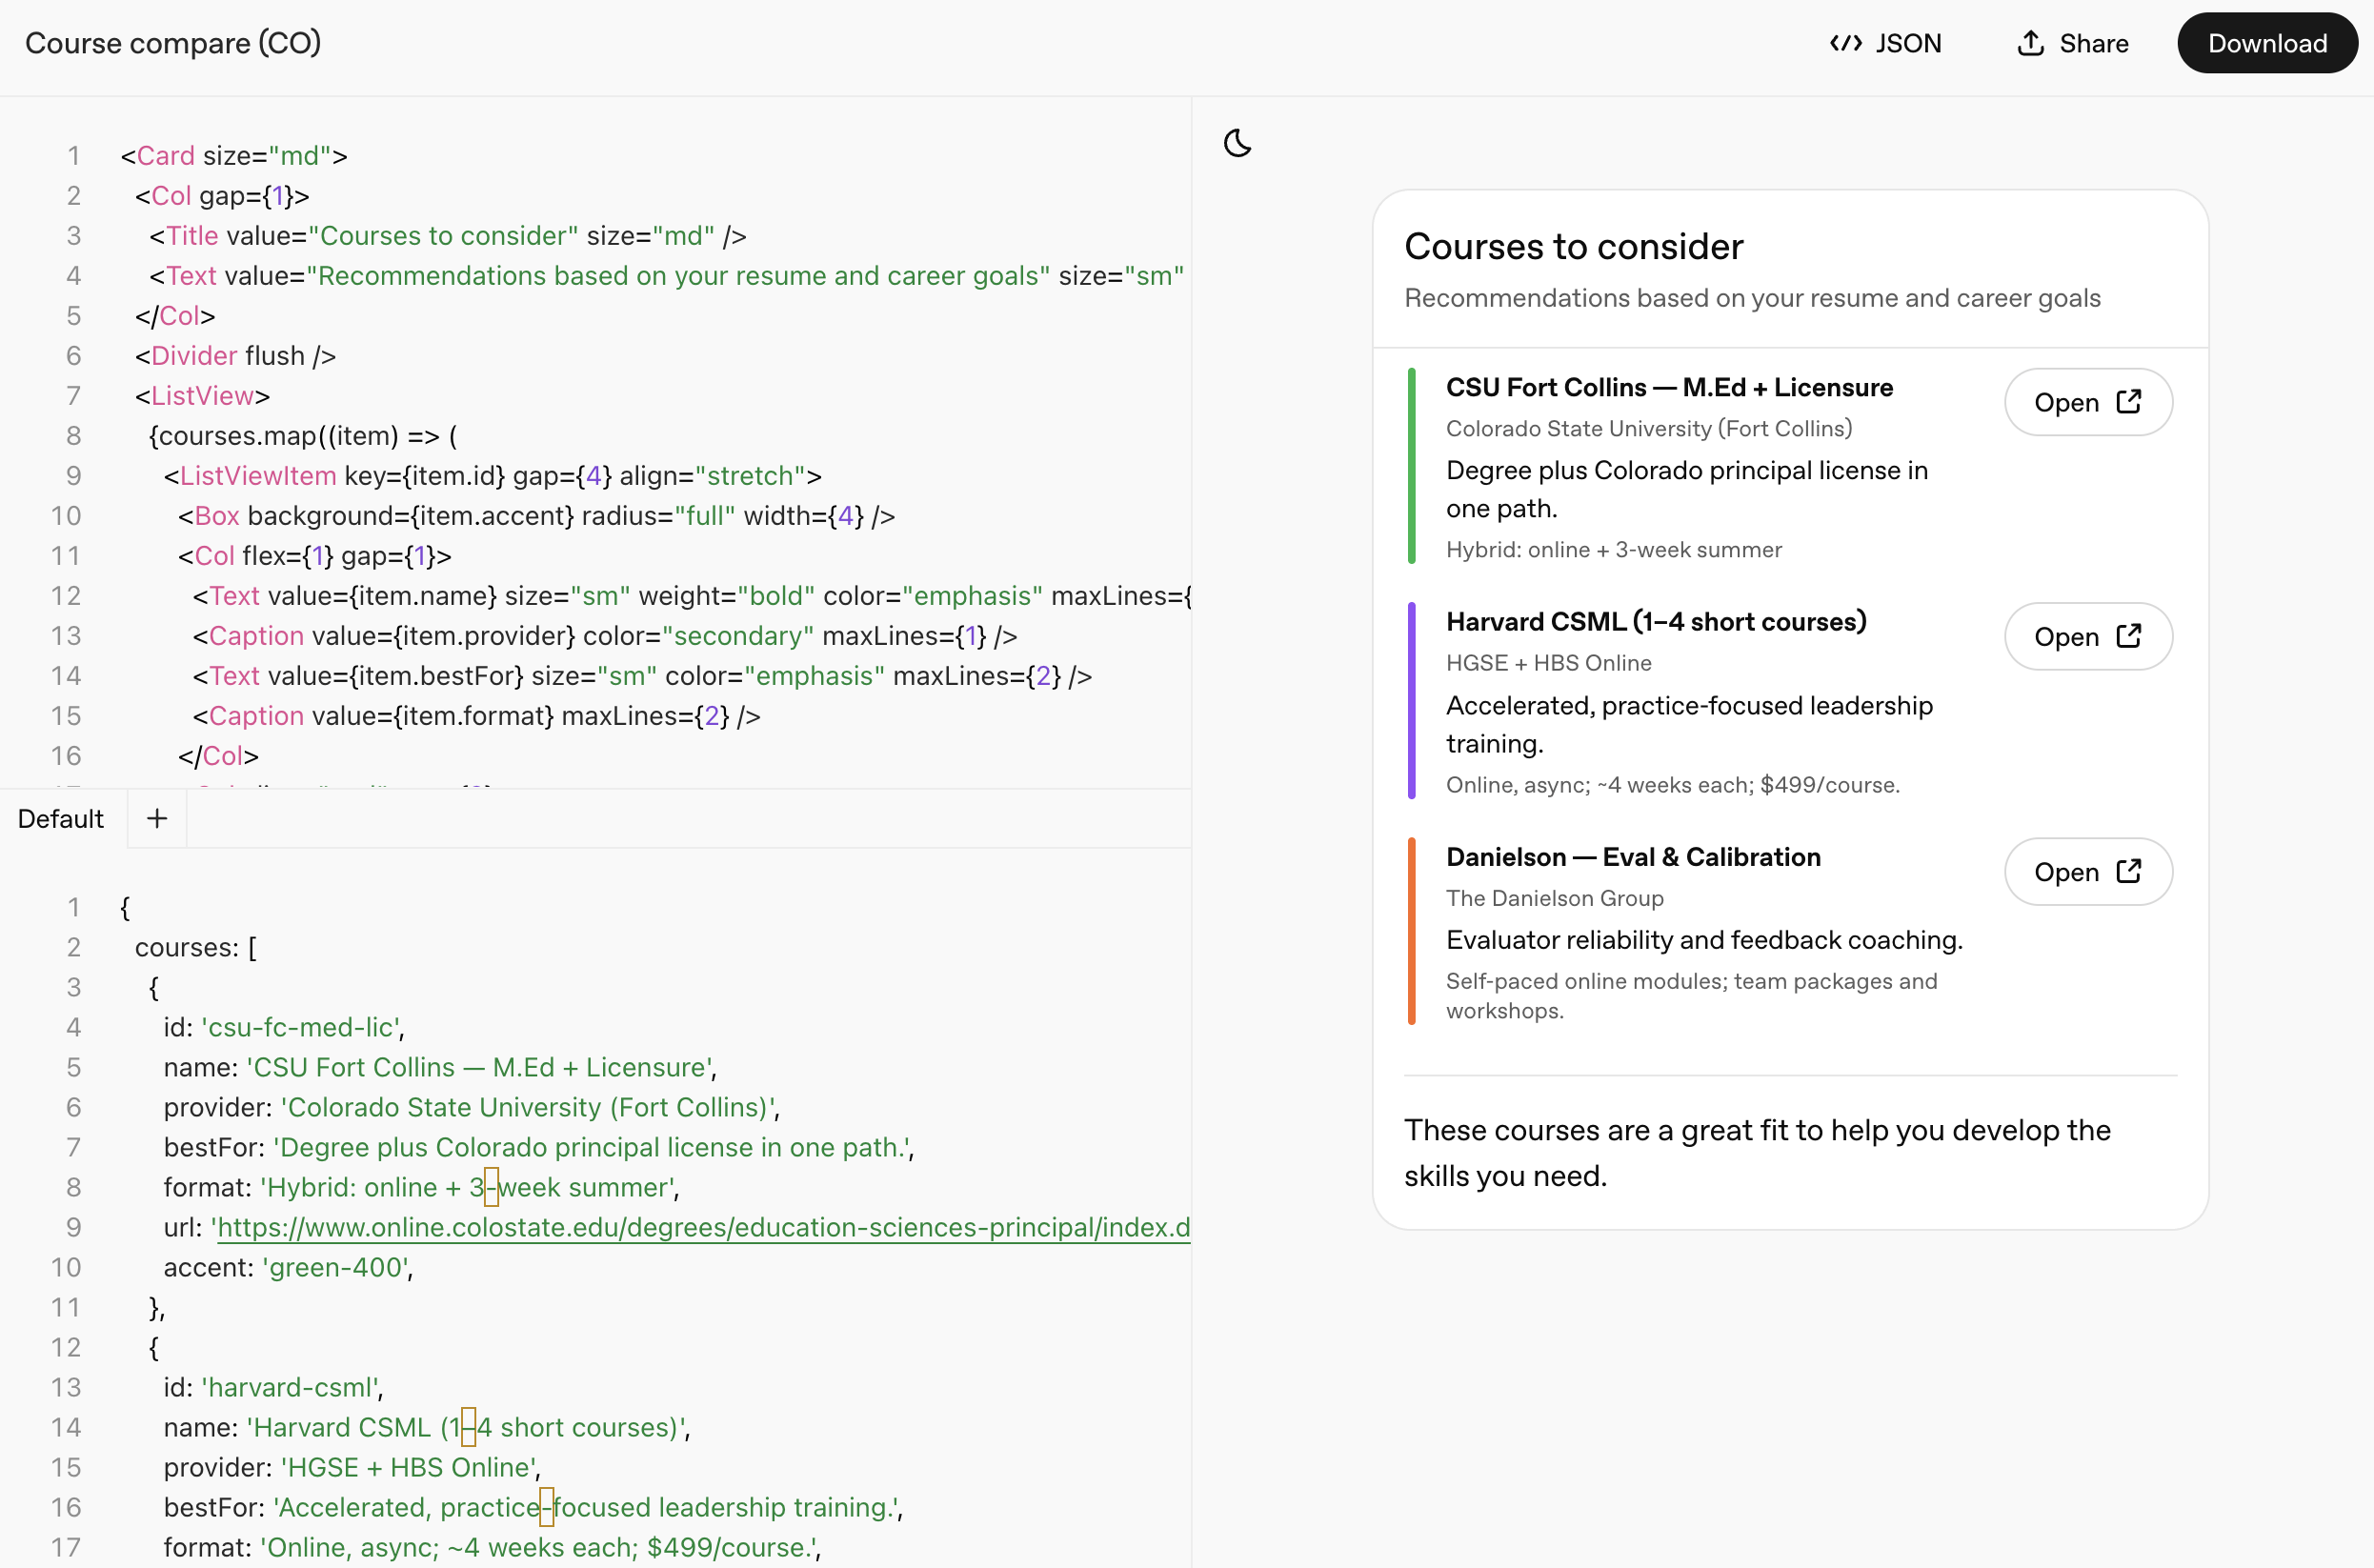
Next, we'll design a custom widget to display our recommended courses in a more intuitive format that makes it easier for users to understand and compare. We can use the Widget Builder to simply describe the output we're looking for, and get an LLM-generated starting point that we can edit further. For this example, we'll present the courses in a list with a clean, structured format, and we'll also show a summary below the recommendations. In the Widget Builder, we can see not only the widget code (top-left), but sample data (bottom-left) and how that data gets rendered within the widget for the end user (right).
When we're happy with the design, we can download the .widget file. (The file used in the screenshot below is located here.)
To actually use the custom widget we've designed in our chat app, we need to instruct our workflow to return the widget component as part of our recommendation agent's response. So we'll go back to the Course recommendations agent, select Output format of Widget, and upload the .widget file.
Our agent will automatically know to output the JSON format required to populate the widget. However, we'll need to update the agent prompt to instruct the model a bit more precisely what information it needs to obtain about each course.
Your job is to identify and recommend online training courses that help develop one or more of the skills identified. Given the list of required skills, return a list of 3-5 online courses along with course details including course name, provider (school or program), recommendation reason (a brief sentence on why you're recommending the course), course format, and URL. In addition to the list of courses, share a few-sentence summary of the recommendations you're making.
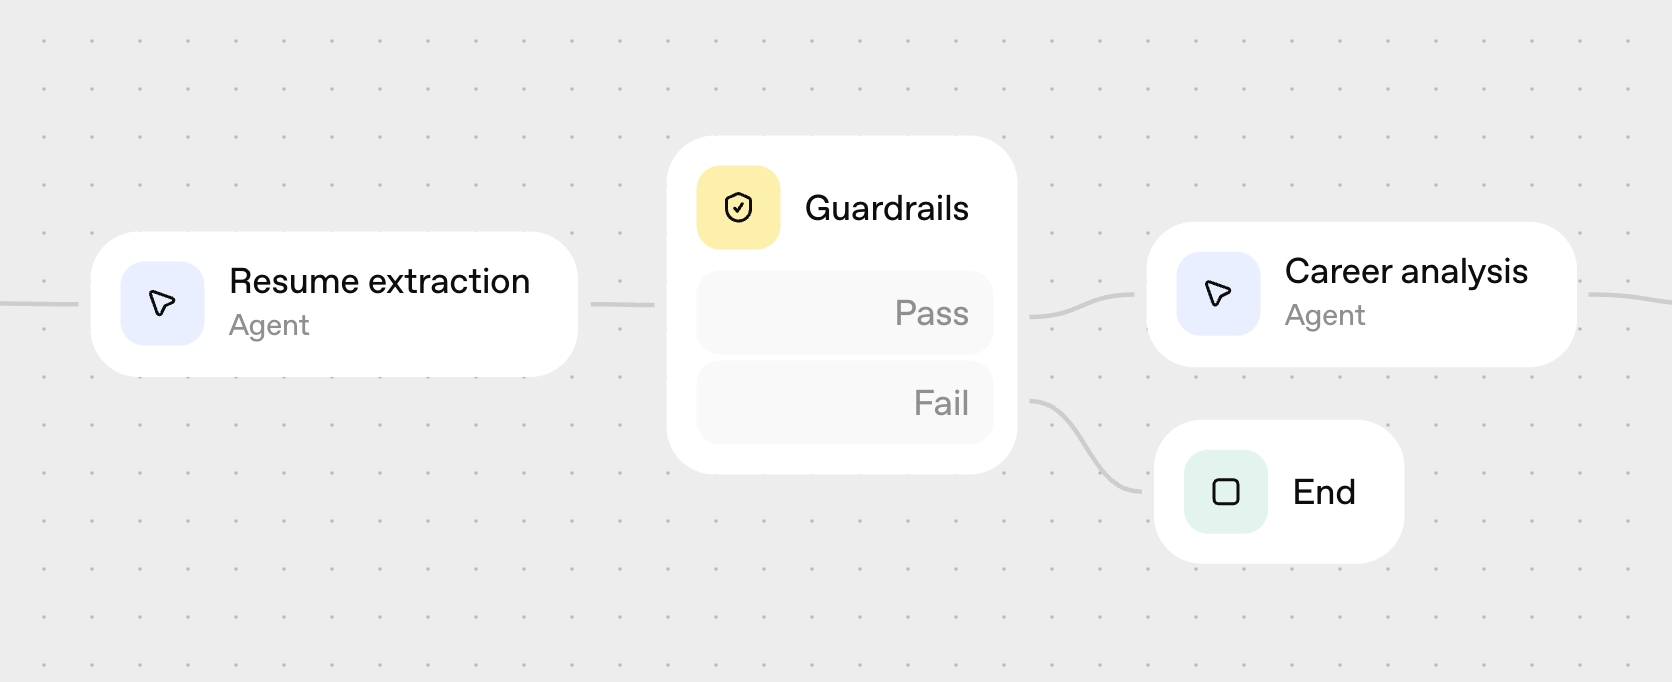
Finally, because we're dealing with resumes, we'll add a guardrail to our workflow to make sure we're not propagating any personally identifiable information (PII) where it doesn't belong. We'll insert this guardrail between our resume parser and our career analysis agents, which will help prevent anything downstream of the resume agent from having access to any PII, such as a name or contact information.
Now we’ll see how the native integrations with Evals help make it easy to optimize both individual agents and your entire workflow. Let's imagine our chat app has been deployed - perhaps to an initial set of internal users or beta testers - and we have some real-world examples of users interacting with the system.
If this application were being developed into a production-grade system where performance and quality were critical, we'd want to incorporate evals even earlier and more systematically into our development process. (You can learn more in Eval Driven System Design about how to build a set of initial evals and established ground truth, mapping evals to business metrics, and progressively improve your system to drive the business goals.)
But in this cookbook, we'll focus less on the techniques behind evals as part of LLM app development, and more about how AgentKit lets you implement these techniques more easily. We'll drive performance improvements in two ways: first we'll optimize a single agent node in our workflow using the prompt optimization tool, then we'll optimize the entire workflow using trace grading.
We want to dive into our Course recommendations agent to see if we can improve the quality of its recommendations to users. We've isolated some sample prompts for this agent from our test environment. (You can also access completed in the Logs tab of the API platform. For this cookbook example, you can access here the data set we'll be using.)
We can optimize our agent starting directly from Agent Builder. Select the Course recommendations agent, and click on "Evaluate" in the bottom right of the agent modal. This will take us directly to the Datasets feature within Evals.
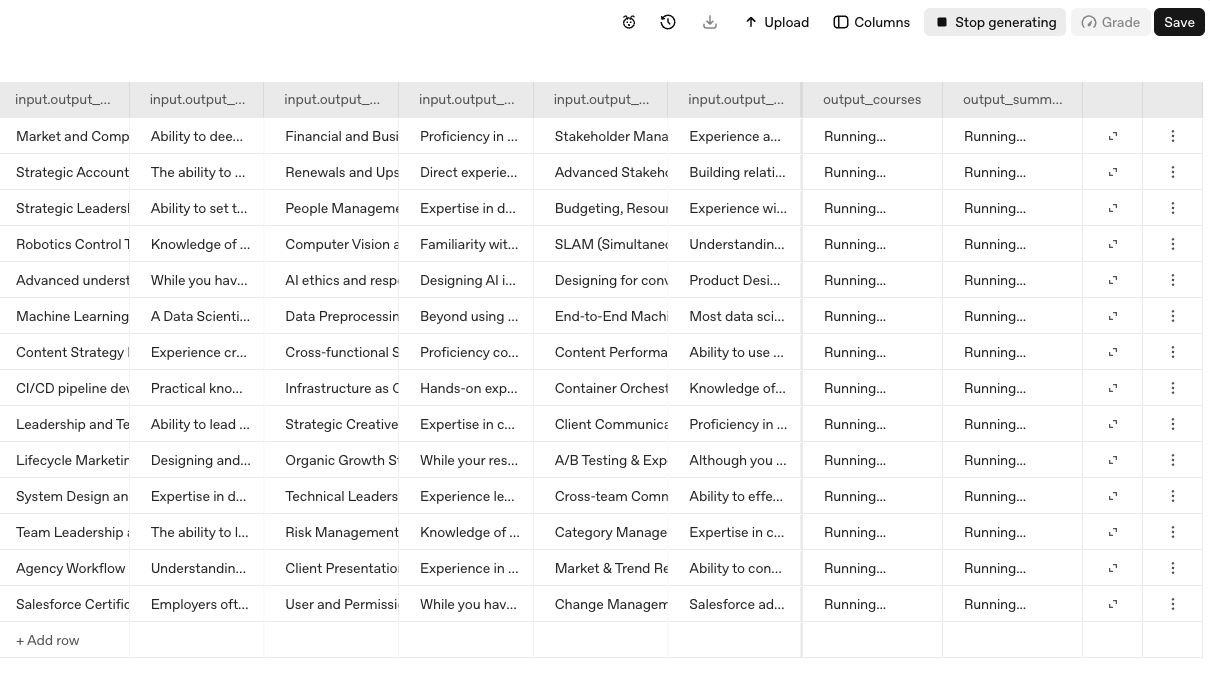
We see the configuration of our agent has been copied over, and we're ready to optimize. Let's first upload the data file with sample prompts (note the column names should match your input and output variables), and click "Generate output" to generate responses.
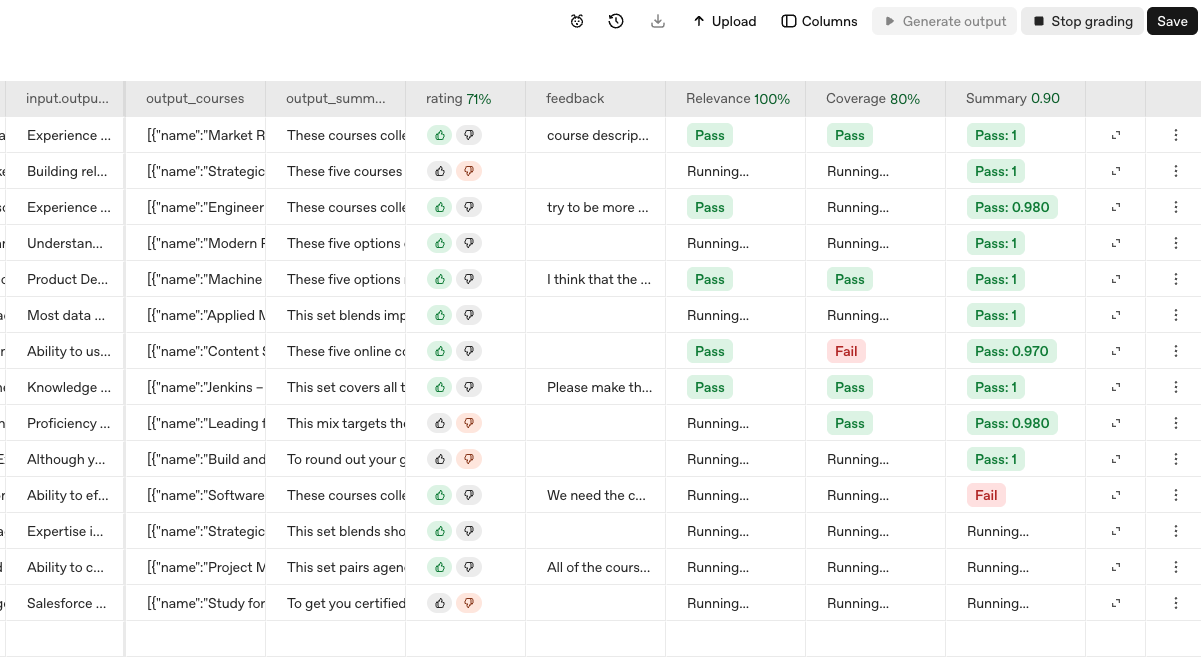
Now, let's create some human annotations and model graders. We'll select "Columns" to add a Rating (thumbs up/down) and Feedback (text input), and we'll manually review our samples to populate these fields with some high-quality feedback. We'll also add a couple of model graders, which will evaluate the agent's output in an automated way based on criteria that we can specify. For this example, we might be concerned about whether the course recommendations are relevant to the skill gaps identified (relevance), whether all of the skill gaps are addressed (coverage), and whether the recommendation summary that is presented is appropriate (style).
Here are example model grader prompts for each criteria:
[relevance] You are evaluating whether a list of recommended courses is relevant to the skills described. Return a pass if all courses are relevant to at least one skill, and fail otherwise.[coverage] You are evaluating whether a list of recommended courses covers all of the skills described. Return a pass if all of the skills are covered by at least one course, and fail otherwise.[summary] You are evaluating whether the summary recommendation provided is relevant, thoughtful, and related to the recommended courses proposed. Evaluate the summary recommendation on a scale of 0 to 1, with 1 being the highest quality.
We'll use GPT-5 for our model graders, and include a 0.7 threshold for the summary grader.
We'll now select Grade > All graders to run these graders against the system output. As the grading proceeds, we'll start to see the cells populated to indicate how each example scored on our model grader criteria.
Now, here's where the magic happens: we can click Optimize to automatically rewrite our prompt based on the feedback we've provided - both the model grader output and the human-provided feedback.
If we examine the new prompt, we see that our prompt contains new Requirements and Output format sections to instruct the model to make the course descriptions more specific, and aim for better coverage of the different skills.
Requirements:- Use the web search tool to find and verify real, currently available online courses and their direct URLs.- Return 3–5 courses that collectively cover the skills. If a course spans multiple skills, indicate it. - Be specific and concise. Each course description must be one sentence (max 35 words) focused on outcomes and topics tied to the skills. - Provide plain text only; no citations or references.Output format:1) Summary (2–4 sentences) explaining how the selections address the skills and any coverage tradeoffs. 2) Courses (3–5 items). For each course, include exactly:` - Course name — Provider (school or program) - Description: [one sentence, max 35 words] - URL: [direct course page] - Skills covered: [list skill names from below]
Now, we can click Update to automatically insert the new prompt into our workflow in Agent Builder. In just a few minutes, we've been able to use real prompt examples and feedback to automatically improve our system's performance - all directly within the Agent Builder and Evals tools.
(Although in this cookbook we've optimized our prompt automatically using this grading output, it's often very helpful to examine specific failure examples to understand in what ways the model might be making mistakes. This analysis can help us generate more precise human-based or model-graded feedback, and even synthesize data to help improve performance against specific failure modes.)
Once we're comfortable with the performance of each individual agent node, we can turn our attention to the full workflow.
Previously, in order to analyze and improve the performance of a complex workflow involving multiple agents, you'd need to read through entire traces of your workflow to understand exactly where and why the system was failing. This can be a time-consuming process, especially when you have a large number of trace examples.
Using trace grading, we can now run end-to-end assessments of full sets of traces using automated model grading. We'll create graders to describe the behavior we're looking to correct, and we'll automatically run these graders across our entire data set.
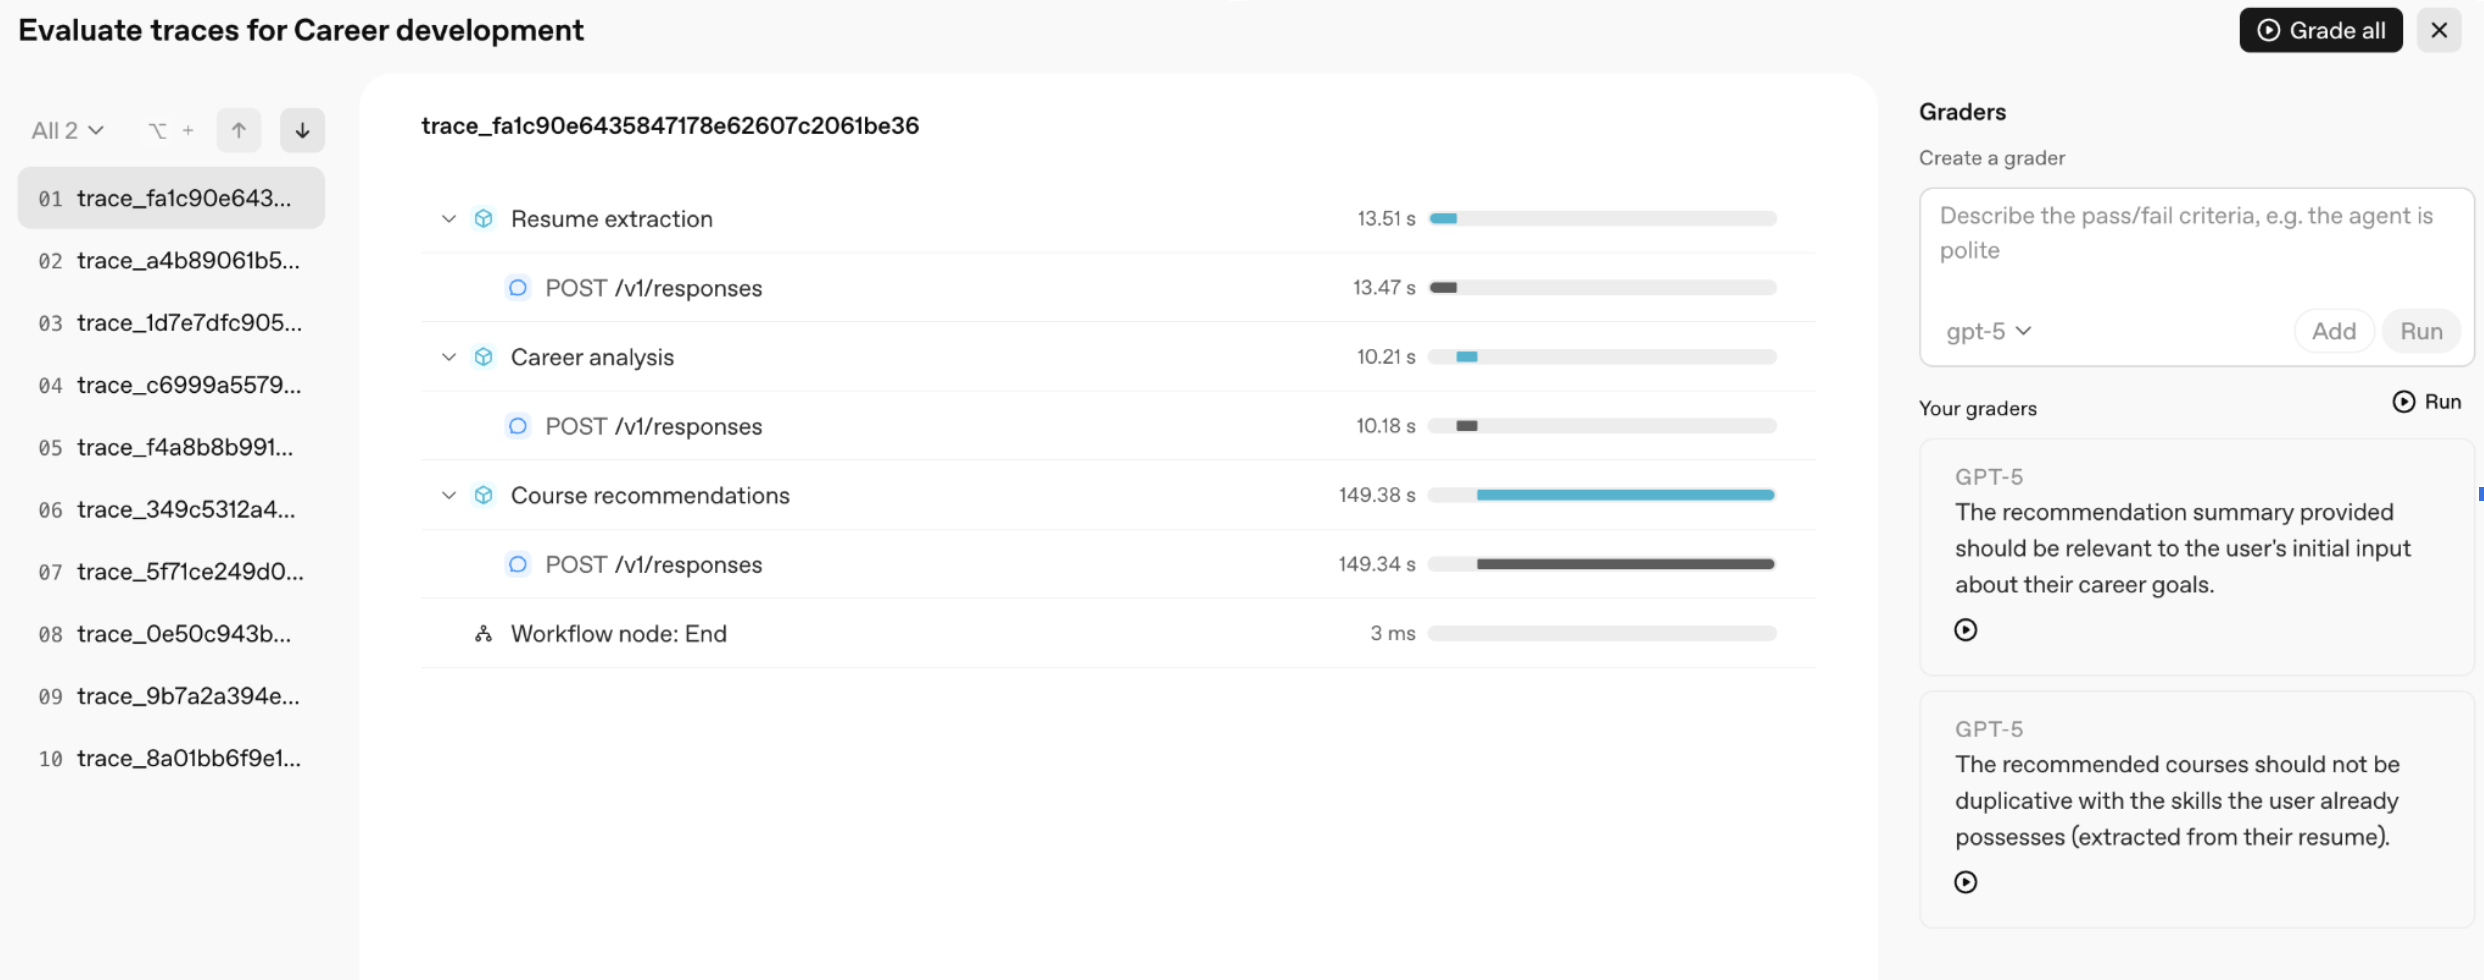
To get started, we'll go back to our workflow in Agent Builder and click Evaluate on the top of the screen. This lets us deep-dive into the traces that have been generated for our workflow runs, including examining the inputs and outputs for all nodes (in this case, the prompts and responses for each of our agents).
We can create graders to run across the entire model trace, defining evaluation criteria for the end-to-end workflow that spans multiple agents. For example, we might want to ensure that the final recommendation summary (output of agent 3) is relevant to the user’s initial input about their career goals (input to agent 1). And, we might want to check that the recommended courses (output of agent 3) are not duplicative with the skills the user already possesses (output of agent 1).
If you had a workflow with conditional statements or while loops, you could grade against more complex multi-step behavior, such as a support agent shouldn’t engage in more than three responses with a user without escalating to a supervisor.
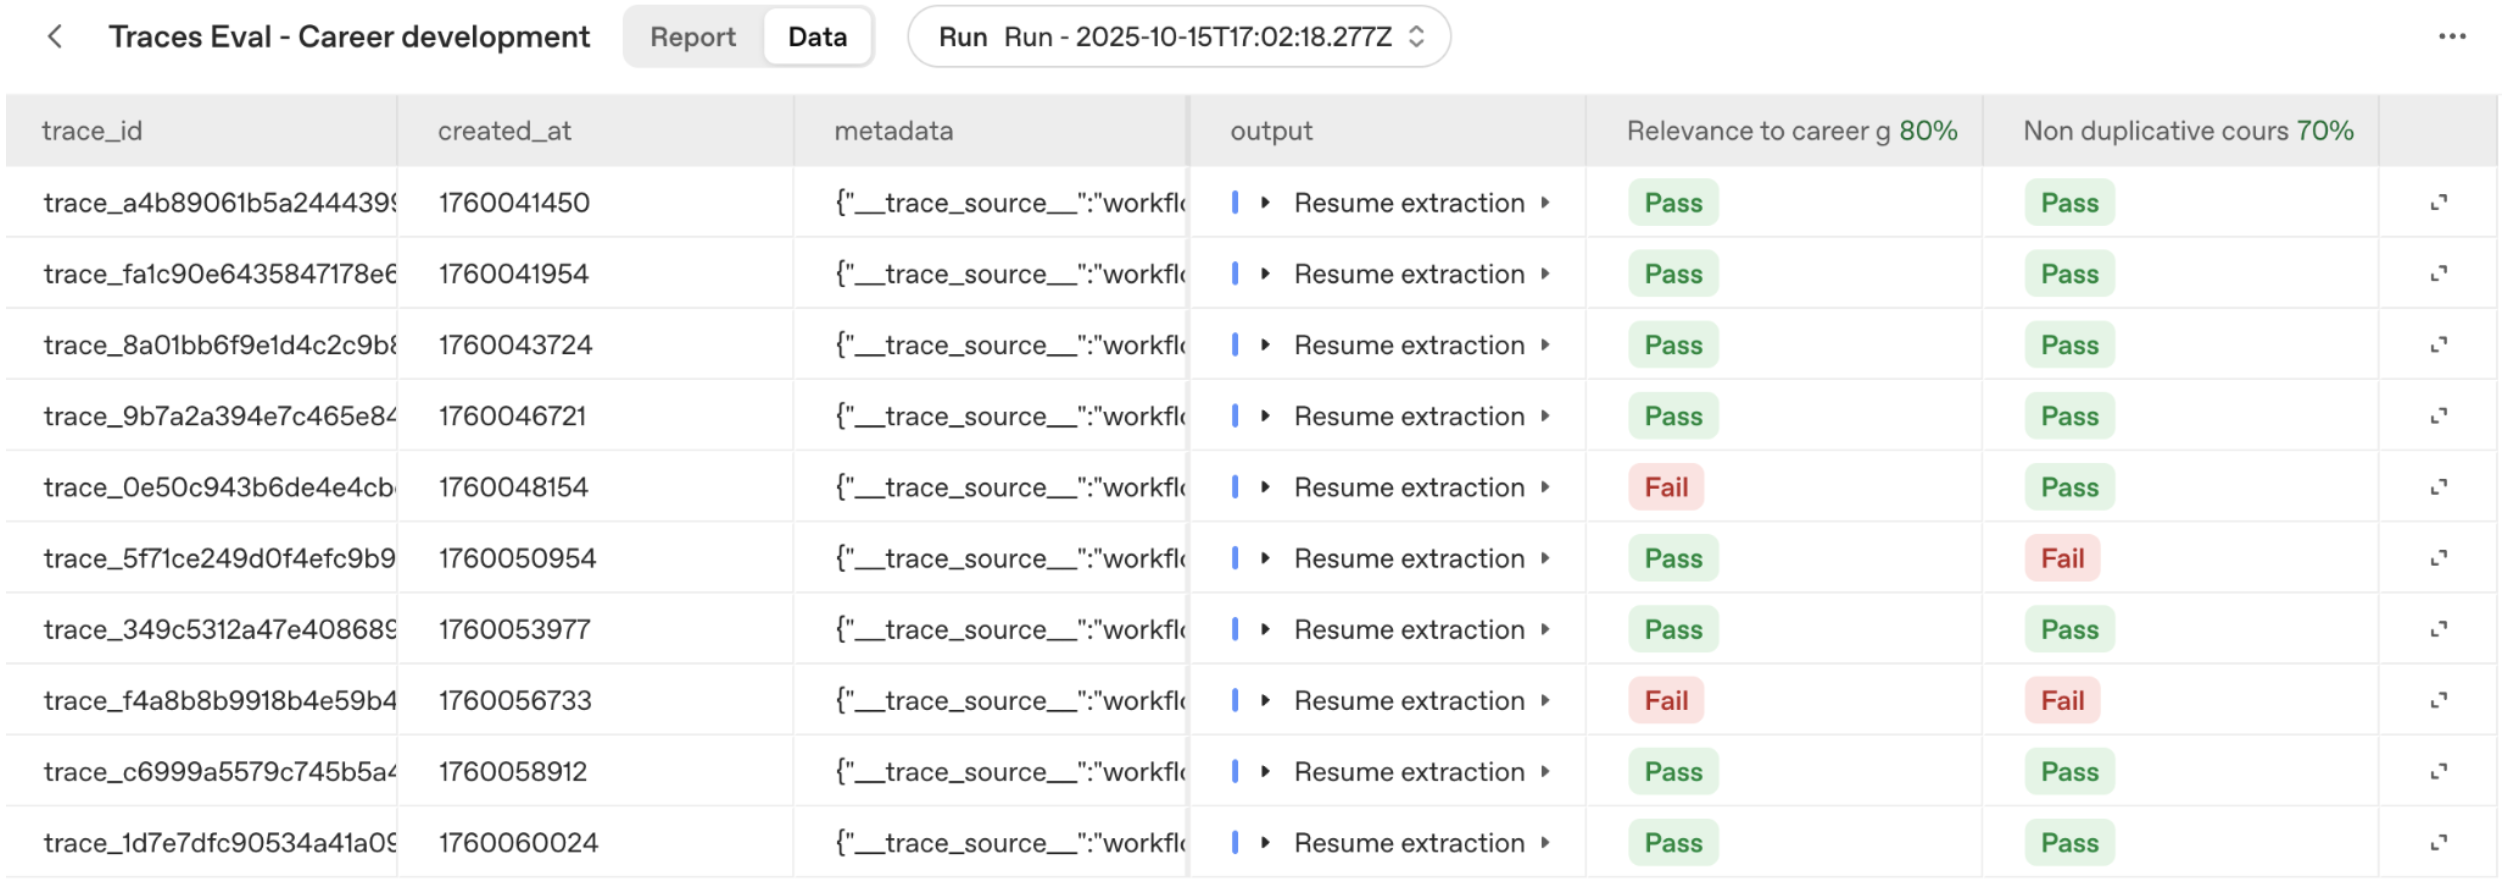
Once we have a full set of grading criteria, we select Grade all to grade our traces. This action will lead us to the Evaluations tab, where we can see a new eval has been created and an eval run has been kicked off.
We can then dive into the workflow traces for our failure cases to better understand why the specific workflow run failed, and how we can improve our system to avoid the failure. This approach helps you optimize complex workflows more efficiently, by iteratively identifying failure modes, evaluating the performance of your system, and targeting improvements to improve performance.
We demonstrated how Agent Builder, ChatKit, and Evals work together to help you build, deploy, and optimize agentic workflows.
With a specific example — a career development app that analyzes resumes, identifies skill gaps, and recommends online courses — we saw how Agent Builder makes it easy to design and build multi-agent workflows, ChatKit lets us embed those workflows in a rich and customizable chat UI, and Evals close the loop by enabling prompt optimization and trace grading against real data.
To learn more, here's a list of some of the resources mentioned in this cookbook: