This page provides an instruction & guide for developers building a GPT Action for a specific application. Before you proceed, make sure to first familiarize yourself with the following information:
This solution enables a GPT action to answer a user’s question with the context of files the user can access in SharePoint or Office365, using Microsoft’s Graph API search capabilities and the ability to retrieve files. It uses Azure Functions to process the Graph API response and convert it to a human readable format or structure it in a way ChatGPT understands. This code is meant to be directional, and you should modify it to your requirements.
This solution pre-processes the file within the Azure Function. The Azure Function returns text, instead of the base64 encoded file. Due to the pre-processing and the conversion to text, this solution is best used for large, unstructured documents, and for when you want to analyze more than the amount of files supported in the first solution (see documentation here).
Value + Example Business Use Cases
Value: Users can now leverage ChatGPT's natural language capability to connect directly to files in Sharpeoint
Example Use Cases:
- A user needs to look up which files relate to a certain topic
- A user needs an answer to a critical question, buried deep in documents
Architecture / Example

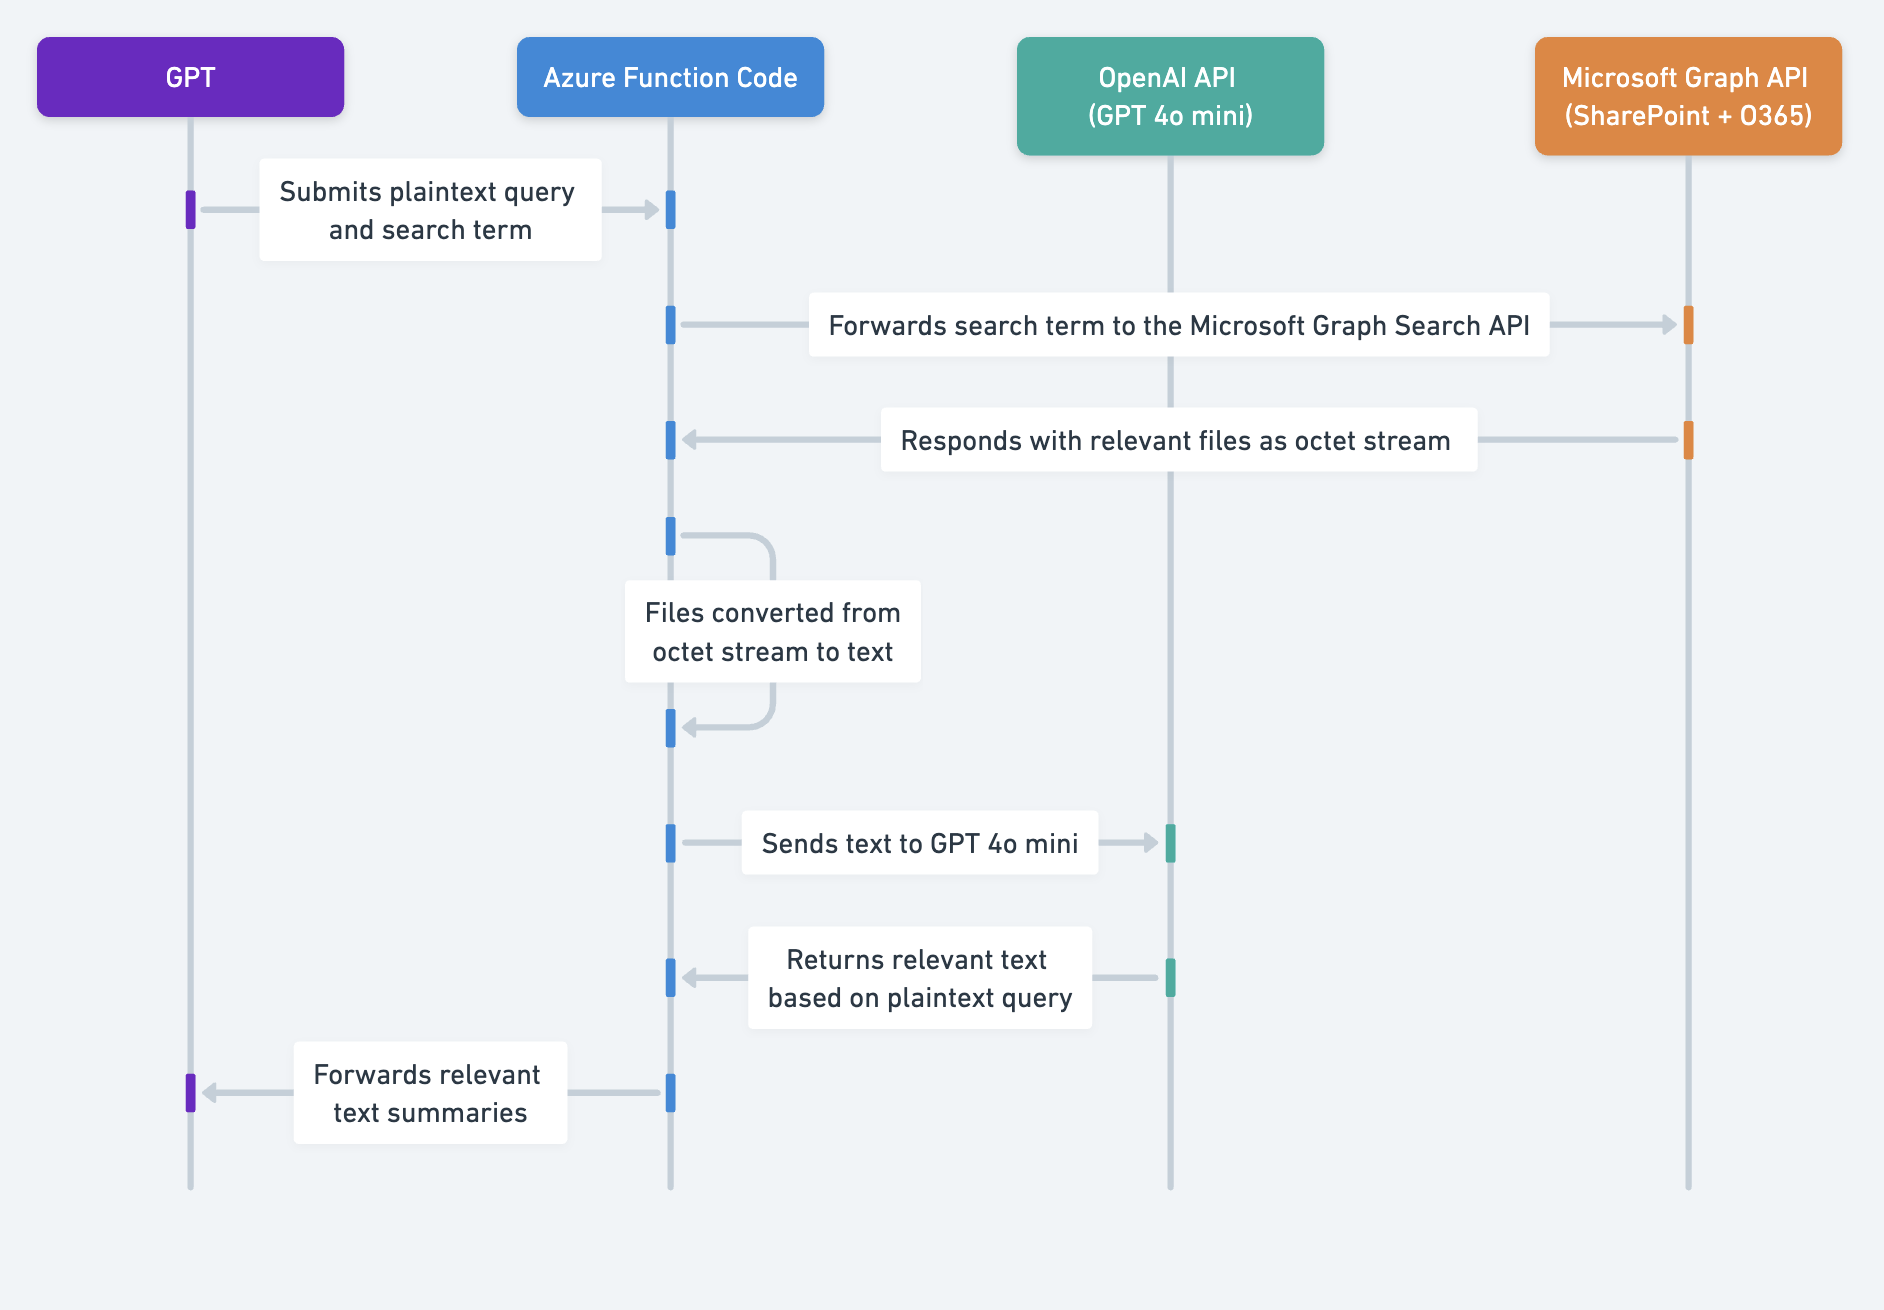
This solution uses a Node.js Azure Function to, based on the logged in user:
-
Search for a relevant file that the user has access to, based on the user’s initial question.
-
For each file that is found, convert it to a consistent readable format and retrieve all the text.
-
Use GPT 4o mini (gpt-4o-mini) to extract the relevant text from the files based on the initial user’s question. Note the pricing of GPT 4o mini here - since we are dealing with small token chunks, the cost of this step is nominal.
-
Returns that data to ChatGPT. The GPT then uses that information to respond to the user's initial question.
As you can see from the below architecture diagram, the first three steps are the same as Solution 1. The main difference is that this solution converts the file to text instead of a base64 string, and then summarizes that text using GPT 4o mini.
Application Information
Application Key Links
Check out these links from the application before you get started:
- Application Website: https://www.microsoft.com/en-us/microsoft-365/sharepoint/collaboration
- Application API Documentation: https://learn.microsoft.com/en-us/previous-versions/office/developer/sharepoint-rest-reference/
Application Prerequisites
Before you get started, make sure you go through the following steps in your application environment:
- Access to a Sharepoint environment
- Postman (and knowledge of APIs and OAuth)
- An OpenAI API Key from platform.openai.com
Middleware Information
If you follow the search concept files guide, the Microsoft Graph Search API returns references to files that fit the criteria, but not the file contents themselves. Therefore, middleware is required, rather than hitting the MSFT endpoints directly.
Steps:
-
loop through the returned files and download the files using the Download File endpoint or Convert File endpoint
-
convert that Binary stream to human readable text using pdf-parse
-
Then, we can optimize further by summarizing using gpt-4o-mini in the function to help with the 100,000 character limit we impose on Actions today.
Additional Steps
Set up Azure Function
- Set up an Azure Function using the steps in the Azure Function cookbook
Add in Function Code
Now that you have an authenticated Azure Function, we can update the function to search SharePoint / O365
- Go to your test function and paste in the code from this file. Save the function.
This code is meant to be directional - while it should work out of the box, it is designed to be customized to your needs (see examples towards the end of this document).
-
Set up the following env variables by going to the Configuration tab on the left under Settings. Note that this may be listed directly in Environment Variables depending on your Azure UI.
-
TENANT_ID: copied from previous section -
CLIENT_ID: copied from previous section -
OPENAI_API_KEY:spin up an OpenAI API key on platform.openai.com.
-
-
Go to the Console tab under the Development Tools
-
Install the following packages in console
-
npm install @microsoft/microsoft-graph-client -
npm install axios -
npm install pdf-parse -
npm install openai
-
-
-
Once this is complete, try calling the function (POST call) from Postman again, putting the below into body (using a query and search term you think will generate responses).
{ "query": "<choose a question>", "searchTerm": "<choose a search term>" } -
If you get a response, you are ready to set this up with a Custom GPT!
Detailed Walkthrough
The below walks through setup instructions and walkthrough unique to this solution of pre-processing the files and extracting summaries in the Azure Function. You can find the entire code here.
Code Walkthrough
Implementing the Authentication
Below we have a few helper functions that we’ll use in the function.
Initializing the Microsoft Graph Client
Create a function to initialize the Graph client with an access token. This will be used to search through Office 365 and SharePoint.
const { Client } = require('@microsoft/microsoft-graph-client');

function initGraphClient(accessToken) {
    return Client.init({
        authProvider: (done) => {
            done(null, accessToken);
        }
    });
}
Obtaining an On-Behalf-Of (OBO) Token
This function uses an existing bearer token to request an OBO token from Microsoft's identity platform. This enables passing through the credentials to ensure the search only returns files the logged-in user can access.
const axios = require('axios');
const qs = require('querystring');

async function getOboToken(userAccessToken) {
    const { TENANT_ID, CLIENT_ID, MICROSOFT_PROVIDER_AUTHENTICATION_SECRET } = process.env;
    const params = {
        client_id: CLIENT_ID,
        client_secret: MICROSOFT_PROVIDER_AUTHENTICATION_SECRET,
        grant_type: 'urn:ietf:params:oauth:grant-type:jwt-bearer',
        assertion: userAccessToken,
        requested_token_use: 'on_behalf_of',
        scope: 'https://graph.microsoft.com/.default'
    };

    const url = `https\://login.microsoftonline.com/${TENANT_ID}/oauth2/v2.0/token`;
    try {
        const response = await axios.post(url, qs.stringify(params), {
            headers: { 'Content-Type': 'application/x-www-form-urlencoded' }
        });
        return response.data.access\_token;
    } catch (error) {
        console.error('Error obtaining OBO token:', error.response?.data || error.message);
        throw error;
    }
}
Retrieving Content from O365 / SharePoint Items
This function fetches the content of drive items, handling different file types and converting files to PDF when necessary for text extraction. This uses the download endpoint for PDFs and the convert endpoint for other supported file types.
const getDriveItemContent = async (client, driveId, itemId, name) => {
    try {
        const fileType = path.extname(name).toLowerCase();
        // the below files types are the ones that are able to be converted to PDF to extract the text. See https://learn.microsoft.com/en-us/graph/api/driveitem-get-content-format?view=graph-rest-1.0&tabs=http
        const allowedFileTypes = ['.pdf', '.doc', '.docx', '.odp', '.ods', '.odt', '.pot', '.potm', '.potx', '.pps', '.ppsx', '.ppsxm', '.ppt', '.pptm', '.pptx', '.rtf'];
        // filePath changes based on file type, adding ?format=pdf to convert non-pdf types to pdf for text extraction, so all files in allowedFileTypes above are converted to pdf
        const filePath = `/drives/${driveId}/items/${itemId}/content` + ((fileType === '.pdf' || fileType === '.txt' || fileType === '.csv') ? '' : '?format=pdf');
        if (allowedFileTypes.includes(fileType)) {
            response = await client.api(filePath).getStream();
            // The below takes the chunks in response and combines
            let chunks = [];
            for await (let chunk of response) {
                chunks.push(chunk);
            }
            let buffer = Buffer.concat(chunks);
            // the below extracts the text from the PDF.
            const pdfContents = await pdfParse(buffer);
            return pdfContents.text;
        } else if (fileType === '.txt') {
            // If the type is txt, it does not need to create a stream and instead just grabs the content
            response = await client.api(filePath).get();
            return response;
        }  else if (fileType === '.csv') {
            response = await client.api(filePath).getStream();
            let chunks = [];
            for await (let chunk of response) {
                chunks.push(chunk);
            }
            let buffer = Buffer.concat(chunks);
            let dataString = buffer.toString('utf-8');
            return dataString

    } else {
        return 'Unsupported File Type';
    }

    } catch (error) {
        console.error('Error fetching drive content:', error);
        throw new Error(`Failed to fetch content for ${name}: ${error.message}`);
    }
};
Integrating GPT 4o mini for Text Analysis
This function utilizes the OpenAI SDK to analyze text extracted from documents and find relevant information based on a user query. This helps to ensure only relevant text to the user’s question is returned to the GPT.
const getRelevantParts = async (text, query) => {
    try {
        // We use your OpenAI key to initialize the OpenAI client
        const openAIKey = process.env["OPENAI_API_KEY"];
        const openai = new OpenAI({
            apiKey: openAIKey,
        });
        const response = await openai.chat.completions.create({
            // Using gpt-4o-mini due to speed to prevent timeouts. You can tweak this prompt as needed
            model: "gpt-4o-mini",
            messages: [
                {"role": "system", "content": "You are a helpful assistant that finds relevant content in text based on a query. You only return the relevant sentences, and you return a maximum of 10 sentences"},
                {"role": "user", "content": `Based on this question: **"${query}"**, get the relevant parts from the following text:*****\n\n${text}*****. If you cannot answer the question based on the text, respond with 'No information provided'`}
            ],
            // using temperature of 0 since we want to just extract the relevant content
            temperature: 0,
            // using max_tokens of 1000, but you can customize this based on the number of documents you are searching.
            max_tokens: 1000
        });
        return response.choices[0].message.content;
    } catch (error) {
        console.error('Error with OpenAI:', error);
        return 'Error processing text with OpenAI' + error;
    }
};
Creating the Azure Function to Handle Requests
Now that we have all these helper functions, the Azure Function will orchestrate the flow, by authenticating the user, performing the search, and iterating through the search results to extract the text and retrieve the relevant parts of the text to the GPT.
Handling HTTP Requests: The function starts by extracting the query and searchTerm from the HTTP request. It checks if the Authorization header is present and extracts the bearer token.
Authentication: Using the bearer token, it obtains an OBO token from Microsoft's identity platform using getOboToken defined above.
Initializing the Graph Client: With the OBO token, it initializes the Microsoft Graph client using initGraphClient defined above.
Document Search: It constructs a search query and sends it to the Microsoft Graph API to find documents based on the searchTerm.
Document Processing: For each document returned by the search:
-
It retrieves the document content using getDriveItemContent.
-
If the file type is supported, it analyzes the content using getRelevantParts, which sends the text to OpenAI's model for extracting relevant information based on the query.
-
It collects the analysis results and includes metadata like the document name and URL.
Response: The function sorts the results by relevance and sends them back in the HTTP response.
module.exports = async function (context, req) {
    const query = req.query.query || (req.body && req.body.query);
    const searchTerm = req.query.searchTerm || (req.body && req.body.searchTerm);
    if (!req.headers.authorization) {
        context.res = {
            status: 400,
            body: 'Authorization header is missing'
        };
        return;
    }
    /// The below takes the token passed to the function, to use to get an OBO token.
    const bearerToken = req.headers.authorization.split(' ')[1];
    let accessToken;
    try {
        accessToken = await getOboToken(bearerToken);
    } catch (error) {
        context.res = {
            status: 500,
            body: `Failed to obtain OBO token: ${error.message}`
        };
        return;
    }
    // Initialize the Graph Client using the initGraphClient function defined above
    let client = initGraphClient(accessToken);
    // this is the search body to be used in the Microsft Graph Search API: https://learn.microsoft.com/en-us/graph/search-concept-files
    const requestBody = {
        requests: [
            {
                entityTypes: ['driveItem'],
                query: {
                    queryString: searchTerm
                },
                from: 0,
                // the below is set to summarize the top 10 search results from the Graph API, but can configure based on your documents.
                size: 10
            }
        ]
    };

    try {
        // Function to tokenize content (e.g., based on words).
        const tokenizeContent = (content) => {
            return content.split(/\s+/);
        };

        // Function to break tokens into 10k token windows for gpt-4o-mini
        const breakIntoTokenWindows = (tokens) => {
            const tokenWindows = []
            const maxWindowTokens = 10000; // 10k tokens
            let startIndex = 0;

            while (startIndex < tokens.length) {
                const window = tokens.slice(startIndex, startIndex + maxWindowTokens);
                tokenWindows.push(window);
                startIndex += maxWindowTokens;
            }

            return tokenWindows;
        };
        // This is where we are doing the search
        const list = await client.api('/search/query').post(requestBody);

        const processList = async () => {
            // This will go through and for each search response, grab the contents of the file and summarize with gpt-4o-mini
            const results = [];

            await Promise.all(list.value[0].hitsContainers.map(async (container) => {
                for (const hit of container.hits) {
                    if (hit.resource["@odata.type"] === "#microsoft.graph.driveItem") {
                        const { name, id } = hit.resource;
                        // We use the below to grab the URL of the file to include in the response
                        const webUrl = hit.resource.webUrl.replace(/\s/g, "%20");
                        // The Microsoft Graph API ranks the reponses, so we use this to order it
                        const rank = hit.rank;
                        // The below is where the file lives
                        const driveId = hit.resource.parentReference.driveId;
                        const contents = await getDriveItemContent(client, driveId, id, name);
                        if (contents !== 'Unsupported File Type') {
                            // Tokenize content using function defined previously
                            const tokens = tokenizeContent(contents);

                            // Break tokens into 10k token windows
                            const tokenWindows = breakIntoTokenWindows(tokens);

                            // Process each token window and combine results
                            const relevantPartsPromises = tokenWindows.map(window => getRelevantParts(window.join(' '), query));
                            const relevantParts = await Promise.all(relevantPartsPromises);
                            const combinedResults = relevantParts.join('\n'); // Combine results

                            results.push({ name, webUrl, rank, contents: combinedResults });
                        }
                        else {
                            results.push({ name, webUrl, rank, contents: 'Unsupported File Type' });
                        }
                    }
                }
            }));

            return results;
        };
        let results;
        if (list.value[0].hitsContainers[0].total == 0) {
            // Return no results found to the API if the Microsoft Graph API returns no results
            results = 'No results found';
        } else {
            // If the Microsoft Graph API does return results, then run processList to iterate through.
            results = await processList();
            results.sort((a, b) => a.rank - b.rank);
        }
        context.res = {
            status: 200,
            body: results
        };
    } catch (error) {
        context.res = {
            status: 500,
            body: `Error performing search or processing results: ${error.message}`,
        };
    }
};
Customizations
Below are some potential areas to customize.
-
You can customize the GPT prompt to search again a certain amount of times if nothing is found.
-
You can customize the code to only search through specific SharePoint sites or O365 Drives by customizing the search query. This will help focus the search and improve the retrieval. The function as setup now looks through all files the logged-in user can access.
-
You could use gpt-4o instead of gpt-4o-mini. This would slightly increase the cost and latency, but you may get higher quality summarizations.
-
You can customize the amount of files it searches through within the call to Microsoft Graph.
Considerations
Note that all the same limitations of Actions apply here, with regards to returning 100K characters or less and the 45 second timeout.
-
This only works for text, not for images. With some additional code in the Azure Function, you could customize this by using GPT-4o to extract summarizations of images.
-
This does not work for structured data. We recommend Solution 1 if structured data is a major part of your use case.
ChatGPT Steps
Custom GPT Instructions
Once you've created a Custom GPT, copy the text below in the Instructions panel. Have questions? Check out Getting Started Example to see how this step works in more detail.
You are a Q&A helper that helps answer users questions. You have access to a documents repository through your API action. When a user asks a question, you pass in that question exactly as stated to the "query" parameter, and for the "searchTerm" you use a single keyword or term you think you should use for the search.

****

Scenario 1: There are answers

If your action returns results, then you take the results from the action and summarize concisely with the webUrl returned from the action. You answer the users question to the best of your knowledge from the action

****

Scenario 2: No results found

If the response you get from the action is "No results found", stop there and let the user know there were no results and that you are going to try a different search term, and explain why. You must always let the user know before conducting another search.

Example:

****

I found no results for "DEI". I am now going to try [insert term] because [insert explanation]

****

Then, try a different searchTerm that is similar to the one you tried before, with a single word.

Try this three times. After the third time, then let the user know you did not find any relevant documents to answer the question, and to check SharePoint. Be sure to be explicit about what you are searching for at each step.

****

In either scenario, try to answer the user's question. If you cannot answer the user's question based on the knowledge you find, let the user know and ask them to go check the HR Docs in SharePoint. If the file is a CSV, XLSX, or XLS, you can tell the user to download the file using the link and re-upload to use Advanced Data Analysis.
OpenAPI Schema
Once you've created a Custom GPT, copy the text below in the Actions panel. Have questions? Check out Getting Started Example to see how this step works in more detail.
The below spec passes in the query parameter to inform the pre-processing and a searchTerm to find the right files in Microsoft Graph.
Make sure to switch the function app name, function name and code based on link copied in screenshot above
openapi: 3.1.0
info:
  title: SharePoint Search API
  description: API for searching SharePoint documents.
  version: 1.0.0
servers:
  - url: https://{your_function_app_name}.azurewebsites.net/api
    description: SharePoint Search API server
paths:
  /{your_function_name}?code={enter your specific endpoint id here}:
    post:
      operationId: searchSharePoint
      summary: Searches SharePoint for documents matching a query and term.
      requestBody:
        required: true
        content:
          application/json:
            schema:
              type: object
              properties:
                query:
                  type: string
                  description: The full query to search for in SharePoint documents.
                searchTerm:
                  type: string
                  description: A specific term to search for within the documents.
      responses:
        '200':
          description: Search results
          content:
            application/json:
              schema:
                type: array
                items:
                  type: object
                  properties:
                    documentName:
                      type: string
                      description: The name of the document.
                    snippet:
                      type: string
                      description: A snippet from the document containing the search term.
                    url:
                      type: string
                      description: The URL to access the document.
Authentication Instructions
Below are instructions on setting up authentication with this 3rd party application. Have questions? Check out Getting Started Example to see how this step works in more detail.
See above and on the Azure Function cookbook for more detailed instructions on authentication.
FAQ & Troubleshooting
-
Why are you using the Microsoft Graph API in your code instead of the SharePoint API?
- The SharePoint API is legacy - per the Microsoft documentation here, “For SharePoint Online, innovation using a REST API against SharePoint is driven via the Microsoft Graph REST API's.” The Graph API gives us more flexibility, and the SharePoint API still runs into the same file issues listed in the Why is this necessary instead of interacting with the Microsoft Graph API directly? section.
-
What types of files does this support?
-
This supports all files listed in the documentation for the Convert File endpoint here. Specifically, it supports pdf, doc, docx, odp, ods, odt, pot, potm, potx, pps, ppsx, ppsxm, ppt, pptm, pptx, rtf.
-
When a search result returns XLS, XLSX, or CSV, this prompts the user to download the file and re-upload to ask questions using Advanced Data Analysis. As stated above, we recommend solution 1 if structured data is part of your use case.
-
-
Why do I need to request an OBO token?
-
When you try to use the same token to authenticate to the Graph API as the one you use to authenticate into the Azure Function, you get an “invalid audience” token. This is because the audience for the token can only be user_impersonation.
-
To address this, the function requests a new token scoped to Files.Read.All within the app using the On Behalf Of flow. This will inherit the permissions of the logged in user, meaning this function will only search through files the logged-in user has access to.
-
We are purposefully requesting a new On Behalf Of token with each request, because Azure Function Apps are meant to be stateless. You could potentially integrate this with Azure Key Vault to store the secret and retrieve programmatically.
-
Are there integrations that you’d like us to prioritize? Are there errors in our integrations? File a PR or issue in our github, and we’ll take a look.